 Puff Pastry and a chicken puffs : Baked from scratch

I love the puff pastry even more than the filling... Back when I was in school I used to eat the skin alone leaving behind the fillings no matter what. I used to love peeling the puff layers one by one and then eat it...But that was then, now I like the combined puffs with the filling...:p especially when it is prepared by me...
I was quite fascinated when I read few articles, videos about puff pastry making, and the off the shelf ingredients. It is very easy to make if the instructions are followed carefully.
This is my third successful attempt....:). Puff pastry sure does puffs up after baking....
Few notes :[from BBC]
------------
- Puff pastry need to be kept cool for best results. This means chilling the ingredients and the utensils before making the pastry, and working on a cool surface.There is an old cooks' saying that people with cold hands are good at making pastry.
- Pastry needs to be mixed quickly. This helps keep it cool but also minimises development of the flour's gluten content, otherwise the pastry may become too elastic, difficult to roll, inclined to shrink, and tough in texture.
- Too much handling can also make the fat soft and the finished pastry greasy.
- Once the dough is formed, chilling it for 30 minutes or so helps relax the gluten and set the fat, making the dough manageable and less likely to shrink.
- Chilling the dough between each stage of making puff pastry is vital.
- Raw shortcrust, puff and flaky pastries can be kept wrapped in cling film in the fridge for two or three days before rolling and baking. They can also be frozen for up to three months.
- Puff pastry uses a special rolling and folding technique to create fine layers of dough that trap air between them. The pastry then puffs up on baking, creating scrumptious leaves with a light texture and rich flavor.
To explain the technique in my own way I made few pictorial representations.
Recipe:
---------
Flour - 1 cup + extra for dusting
Water - little less than 1/2 cup
Butter block - 1/2 cup + 1 tbsp melted butter
Salt
Vinegar - few drops
- I used the back of the the baking tray for rolling.
- Place the baking tray in the refrigerator to make it cool.
- Combine flour, salt, water and melted butter to make a soft dough.
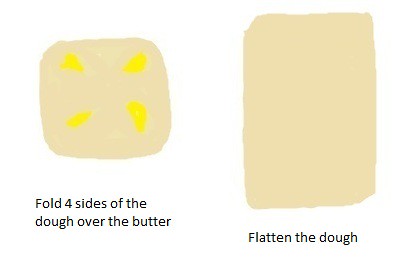
- Take the tray from the refrigerator and roll the dough to four sides forming the shape of a cross with thick center and tapering towards the four sides. Refrigerate the dough along with the baking tray.
- Take the butter from the refrigerator and dust some flour and mould it to a workable consistency. Roll the butter into a square shape. Do not let it melt. If it starts to melt refrigerate it for sometime and then work on it.
- Take the dough from the refrigerator and place the butter on the dough.
- Stretch the sides of the dough and seal the butter.
- Flatten the dough using the rolling pin by dusting some flour into a rectangular shape.
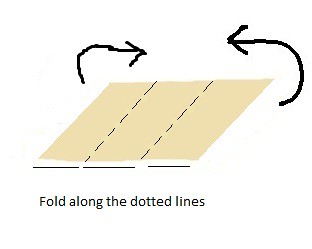
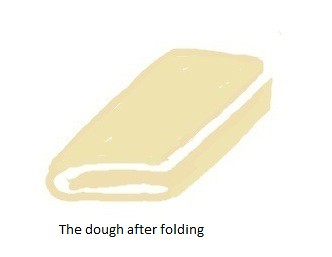
- Fold along the dotted lines and roll into a rectangle.
- Turn the dough to left and fold along the dotted line and quickly roll into a rectangle.
- Again turn the dough fold along the dotted lines. Refrigerate for 20 minutes.
- Repeat steps from 8 to 11 two more times, refrigerating for 20 min after every two folds. So a total of 6 folds are made.
- After the sixth fold, roll into a big rectangle.
- Wrap and refrigerate for 2 days or freeze it.


For the filling:
----------------
- Chicken breast - 1 or cooked and shredded chicken - 1 1/2 cup.
- Turmeric powder - 1/2 tsp
- Onion - 1 cup finely chopped
- Garlic - 1 tbsp finely chopped
- Ginger - 1 tbsp finely chopped
- Green chilli - 2 small
- Red Chilli powder - 1 tsp
- Chicken Masala powder - 1 tsp
- Cumin powder - 1/4 tsp
- Garam Masala - 1/4 tsp
- Salt
- Water
- Oil
- Cut the chicken breast into small pieces.
- In a sauce pan add some water(just enough to cook the chicken pieces), turmeric powder, salt and add the chicken pieces.
- Cover and cook the chicken
- When the chicken is cooked open the lid and cook till all the water is dried up.
- When the chicken pieces are cooled, shred the chicken in a food processor.
- In a pan heat some oil, add ginger and garlic. Saute for a min.
- Add the onion and green chilies. Saute till soft.
- Add 7,8,9,10, Saute till the masalas are cooked or the oil starts to appear.
- Add the shredded chicken, mix well with the masalas for a minute or two.
Stuffing process:
--------------------
- Preheat the oven to 450F.
- Cut the puff pastry.
- Roll it to desired thickness.
- To make one chicken puff....take two round (any desired shape) shaped pastry.
- On one of the pastry place one spoon of chicken filling and seal it with the second round shape pastry. Sealing can be done with egg white or water.
- Place it on the baking tray.
- Repeat the process.
- Before baking refrigerate for 10 min.
- Bake for 10min or till it turns golden brown.


This looks perfect Ann..Kudos to you for making the pastry from scratch..Thats a lot of work dear...Our fav puffs..
ReplyDeleteur pastry puffs look superb..i love the idea making pastry sheet from scratch..very well explained with illustration .. thanks for sharing i was searching for recipe to make pastry sheets
ReplyDeleteSatya
http://www.superyummyrecipes.com
Thanx a bunch for stopping by kothiyavunu..
ReplyDeleteWow..pufffs looks perfect..its a great one. Sounds like lot of work..its good to discover your blog. Wonderful creation.
keep rocking dea..!!!
Hope to see ur updates with many more yummy treats..
Cheers..:)
Wow, its good to discover your blog. Wonderful creation. Never had them before, but bet...its a great one. Sounds like lot of work...but a must try one...will keep this in mind!:)
WOW!! That is so impressive..Your puff pastry looks perfect!! Great job!!
ReplyDeletewell im thoroughly confused by the making process, and thats when store bought pastry comes 2 the rescue:)
ReplyDeletehats off to you for making it from scratch..i recently made chicken puffs as well:)
my god... you are really talented ann, i will try this defenitely.. what a super looking puffs just reminds me of kerala bakery puffs which we used to have regularly. your puffa evokes nostalgia.
ReplyDeleteThis is fantastic. Luved ur little caricatures the best. looks like 'melting butter' was not an issue to u. Kudos on trying this dear. I go for the shop brought one for my puffs usually. Ur post has made me think again. Well done.
ReplyDeleteKU the good work